The first time I tried snow skin mooncakes I pressed too hard and the dough split open along the side, leaking custard onto the counter. I spent the next afternoon figuring out why. The answer was not the recipe. It was the temperature of the dough and the thickness of the wrapper, two things nobody mentions because the traditional baked mooncake gets all the attention.
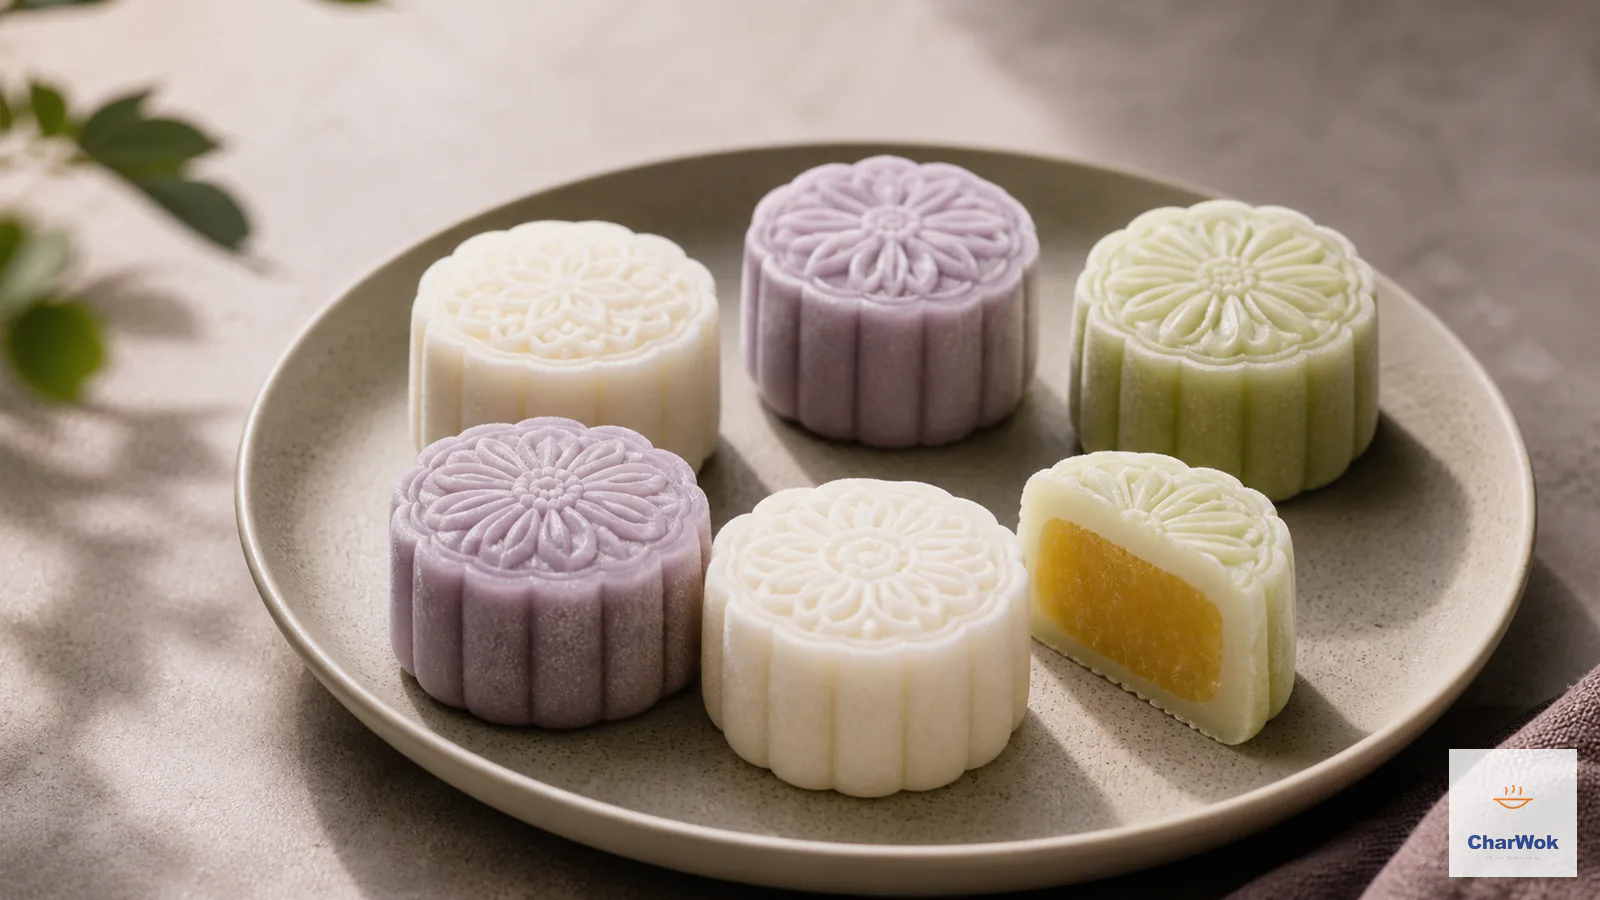
Snow skin mooncakes (bĭng pí yuè bĭng, 冰皮月饼) are the no-bake cousin of the classic Cantonese mooncake. Where the traditional version depends on a golden syrup and lye-water dough baked until mahogany, the snow skin is a cooked, tender, faintly chewy wrapper that never sees the inside of an oven. The name comes from the pale, almost translucent finish that supposedly recalls frost on a windowpane. It was developed in Hong Kong in the late 1980s as a lighter, less oily alternative for the Mid-Autumn Festival, and it has since overtaken the baked version in popularity across southern China and the diaspora. If you want the baked original, my classic mooncake recipe walks through that dough; this article is the cold path.
At a glance: The skin is a heat-set dough of glutinous rice flour, regular rice flour, wheat starch, sugar, and milk, cooked to a soft mochi-like texture, then wrapped cold around a cooked custard filling. Plan on 30 minutes of active work plus 2 hours of chilling. Keep the dough-to-filling ratio near 3:7 by weight so the wrapper is thin enough to be tender but thick enough to hold a seal.
What makes the skin tender instead of gummy
The skin is the hard part, so it is worth understanding before you touch a pan. Three flours do three different jobs. Glutinous rice flour (also called sweet rice flour) provides the stretch and the characteristic chew through amylopectin, the branched starch molecule that gives mochi its pull. Plain rice flour, made from non-sticky long- or medium-grain rice, cuts that chew so the result is soft rather than rubbery. Wheat starch, the same stuff used for har gow wrappers, adds a translucent, silky quality and keeps the cooked dough from snapping back when you press it into a mold.
Skip the regular rice flour and you get a skin that stretches like taffy. Drop the wheat starch and you lose the delicate, near-translucent look that gives the dish its name. Each ingredient earns its place, which is also why the ratio matters more than the absolute amounts.
The filling: a stovetop custard, not a baked one
The custard here is a cooked paste, closer in spirit to the filling of steamed custard buns (nai wong bao) than to a Western pastry cream. Eggs, condensed milk, butter, and sugar are bound with starch and then cooked slowly in a pan until the starch gelatinizes and the whole mass turns into a pliable dough you can roll into balls. Low heat is non-negotiable. Cook it too fast and the eggs scramble into curds before the starch has time to set, leaving you with a grainy, weeping mess instead of a smooth paste.
This same stovetop custard logic shows up across Chinese sweets, from mango pancakes to ginger milk curd. Once you can cook a starch-thickened custard without scrambling it, a lot of desserts open up.
Ingredients
Ingredients at a glance
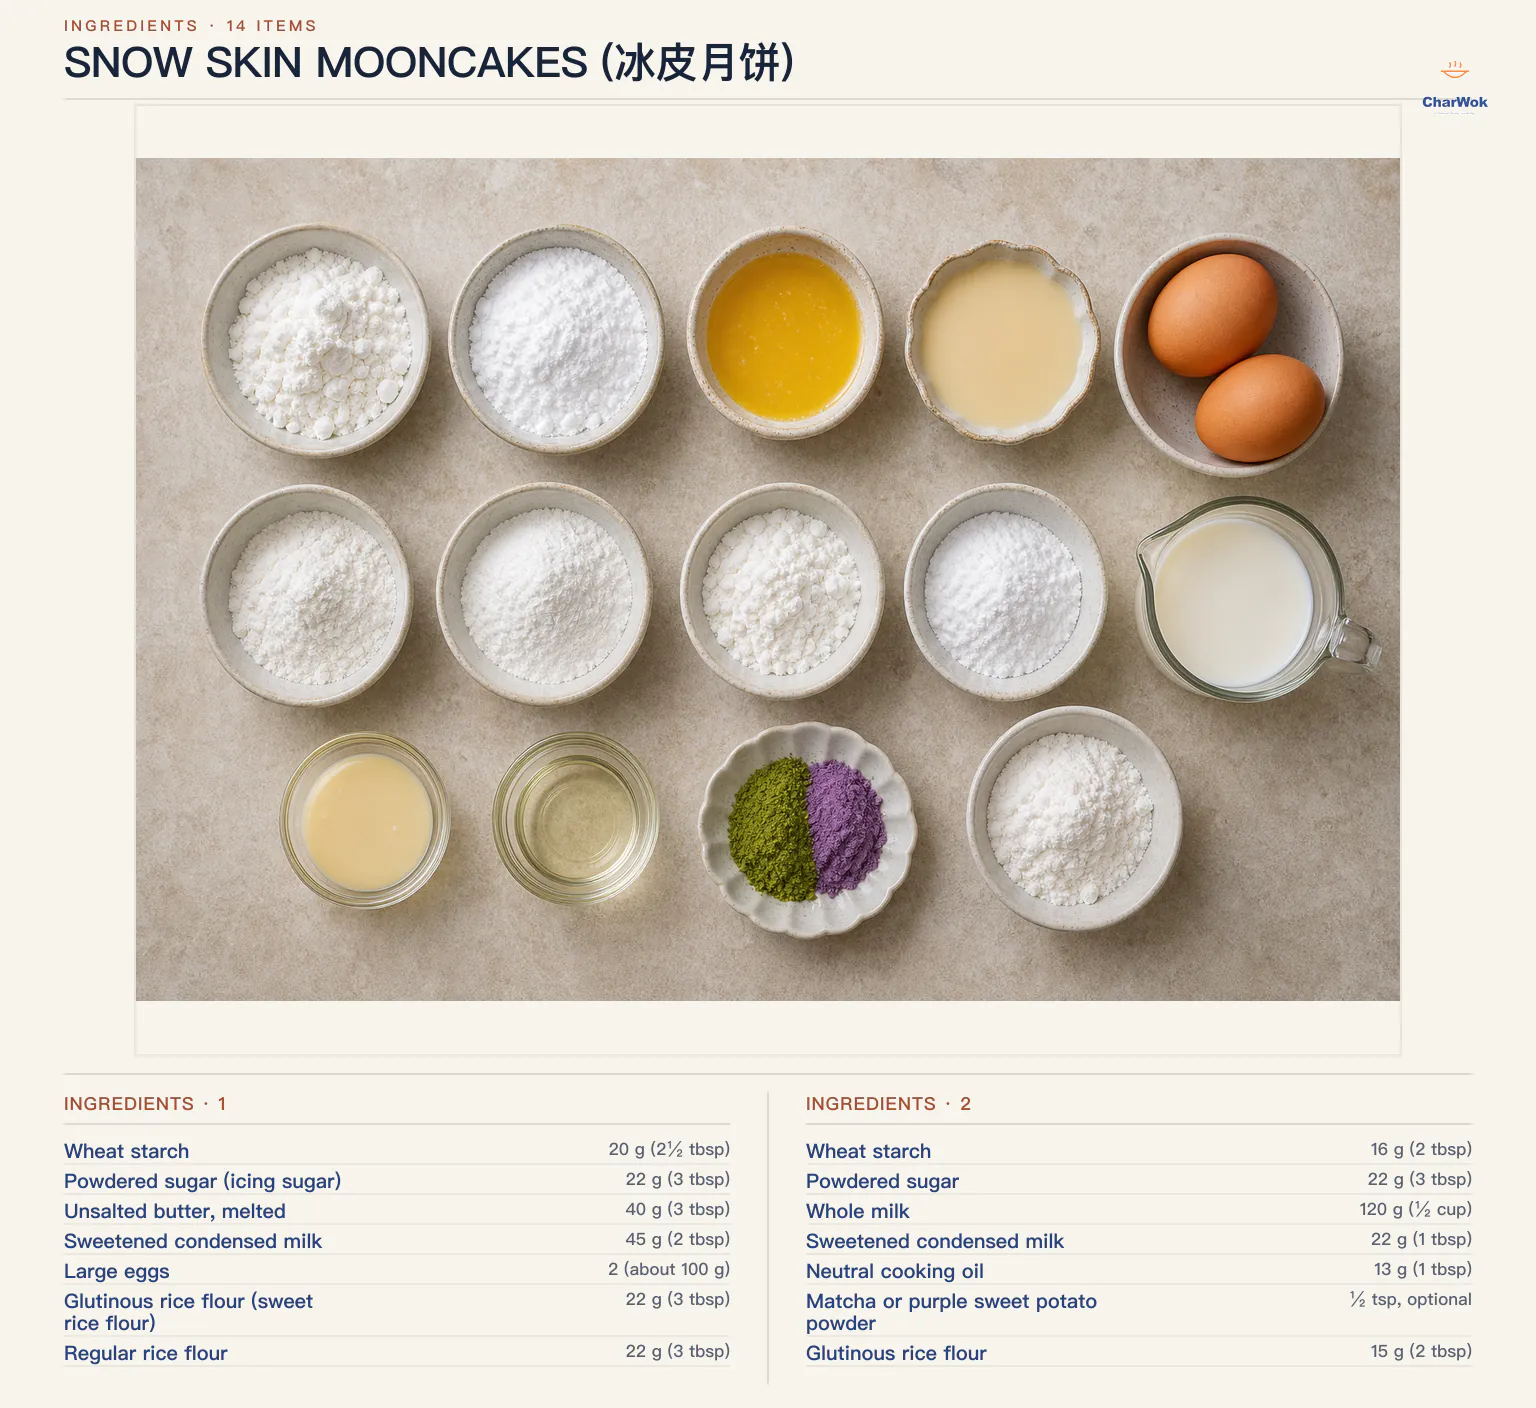
Makes 8 mooncakes in a standard 50-gram mold. Weigh the flours if you can; tablespoon measurements of starch vary wildly depending on how packed they are.
| Ingredient | Amount | Notes / substitute |
|---|---|---|
| Custard filling | ||
| Wheat starch | 20 g (2½ tbsp) | Cornstarch or tapioca starch work; wheat starch gives the silkiest texture |
| Powdered sugar (icing sugar) | 22 g (3 tbsp) | Do not swap granulated; it will not dissolve |
| Unsalted butter, melted | 40 g (3 tbsp) | Coconut oil works and adds fragrance |
| Sweetened condensed milk | 45 g (2 tbsp) | The sugar and dairy in one; hard to replace |
| Large eggs | 2 (about 100 g) | Whole eggs, not yolks |
| Snow skin | ||
| Glutinous rice flour (sweet rice flour) | 22 g (3 tbsp) | Mochiko or similar; do not use regular rice flour here |
| Regular rice flour | 22 g (3 tbsp) | Not glutinous; this tempers the chew |
| Wheat starch | 16 g (2 tbsp) | Cornstarch or tapioca starch as a substitute |
| Powdered sugar | 22 g (3 tbsp) | Sift if lumpy |
| Whole milk | 120 g (½ cup) | Full-fat preferred; coconut milk works for a richer flavor |
| Sweetened condensed milk | 22 g (1 tbsp) | Boosts browning and softness |
| Neutral cooking oil | 13 g (1 tbsp) | Grapeseed, canola, or mild vegetable oil |
| Matcha or purple sweet potato powder | ½ tsp, optional | For coloring; see variations |
| For dusting | ||
| Glutinous rice flour | 15 g (2 tbsp) | Toasted, called gao fen; see method |
Cook the custard filling first
- Whisk the base. In a bowl, combine the wheat starch, powdered sugar, melted butter, and condensed milk. Add the eggs and whisk until completely smooth with no starch lumps. Strain if you see flecks of egg white; they will show up as pale threads in the finished filling.
- Cook over low heat. Pour the mixture into a nonstick saucepan and set it over the lowest flame your burner holds. You are waiting for the starch to gelatinize, which happens around 65°C (150°F). Resist the urge to stir early. Let the bottom set, then use a flexible spatula to scrape and fold constantly so the cooked layer keeps folding into the raw.
- Stop at the playdough stage. The filling is done when it pulls away from the pan cleanly and holds a ball-shape when you press it. It should look glossy, not dry and crumbly. Undercooking leaves it runny; overcooking makes it chalky. Aim for the soft side, because chilling firms it up.
- Cover and chill. Scrape the filling into a bowl and press cling film directly onto the surface to stop a skin from forming. Cool to room temperature, then refrigerate at least 1 hour, ideally 2, until it is firm enough to roll without sticking to your palms.
The cling film contact is the detail people skip. A dried skin on top of the custard means lumps later, and no amount of kneading fully fixes it.
Cook the snow skin dough
While the filling chills, make the skin. The dough is cooked, not kneaded raw, because glutinous rice flour raw tastes chalky and is not pleasant to eat. Two cooking methods work; pick by equipment, not by preference.
- Whisk the batter. In a bowl, whisk the glutinous rice flour, regular rice flour, wheat starch, and powdered sugar. Pour in the milk and whisk smooth. Add the condensed milk and oil and stir until the batter is uniform with a thin, crepe-batter consistency.
- Cook it through. Pour into a deep, heatproof plate and cover with a second plate or a piece of cling film. Either microwave on high for 4 minutes, pausing halfway to stir, or steam for 20 minutes over medium-high heat in a covered setup like the ones in this bamboo steamer guide. Steaming gives a more even set; the microwave is faster but can leave a wet center if your wattage is low.
- Check it is fully set. The dough should be opaque throughout with no milky, wet patches when you tear it open. A translucent, wet core means another 30 seconds in the microwave or another 3 minutes of steam. Raw glutinous rice flour in the middle will taste starchy and spoil the texture.
- Cool, then knead. Scrape the hot dough onto a clean plate to cool faster. When you can handle it, put on food-safe gloves (the dough will stick to bare skin like glue) and knead it for about a minute until smooth and stretchy. Wrap in cling film if you are not shaping right away, since the surface dries out and cracks.
The dusting flour nobody tells you to toast
There is a step that separates a clean mold release from a stuck, torn mess. Toast 2 tablespoons of glutinous rice flour in a dry pan over low heat for about 4 minutes, stirring, until it smells nutty and looks a shade darker. This is gao fen, cooked glutinous flour, and it is what you dust the mold and the dough with. Raw flour would hydrate from the moisture in the skin and turn gummy; toasted flour stays dry and acts as a true release agent. Let it cool before using.
Shape and press the mooncakes
Use a 50-gram spring-loaded mooncake mold for these proportions. The dough-to-filling split I recommend is roughly 20 grams of skin to 30 grams of filling per mooncake. Heavier on the filling and the wrapper tears; heavier on the skin and it reads as doughy.
- Portion both. Knead the chilled filling briefly to smooth it, then divide into 8 equal pieces of about 30 g and roll each into a ball. Divide the skin into 8 pieces of about 20 g. Cover everything with cling film as you work so neither dries out.
- Wrap one at a time. Flatten a skin ball into a disc about 8 cm across, thicker in the center and thinner at the edge. Set a filling ball in the middle. With thumb and fingers of your dominant hand, push the dough up and over the filling while your other hand turns the ball. The motion is upward, not inward; pushing inward squeezes the filling out the top. Seal the pinch at the apex and roll lightly between gloved palms to even it out.
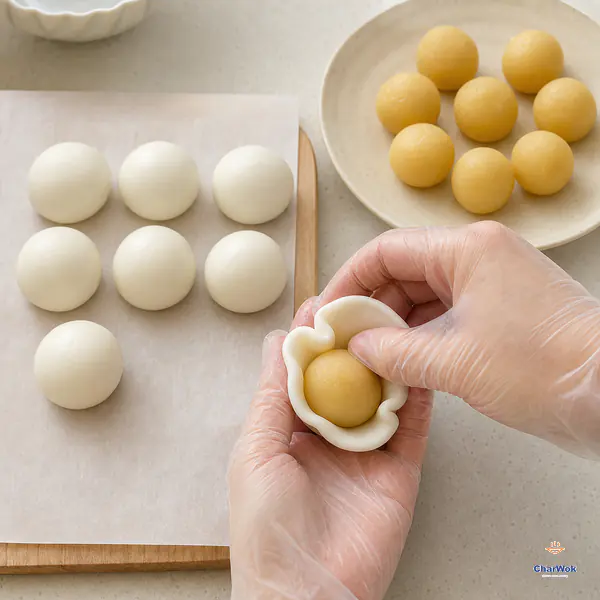
Flatten one skin ball with a slightly thicker centre, set the filling in the middle and push the wrapper upward a little at a time; keep the filling centred and pinch the top fully closed.
- Dust sparingly. Roll the assembled ball in the toasted flour, then brush off almost all of it with your fingers. You want the faintest film. Excess flour leaves a chalky white bloom on the finished mooncake.
- Press and release. Drop the ball into the mold, sealed side up. Set the mold opening-down on a board dusted with toasted flour. Press the spring handle firmly and evenly, hold one second, then lift the mold straight up. Press the handle again to eject the mooncake. If it sticks, the dough was too warm; chill it for 5 minutes and retry.
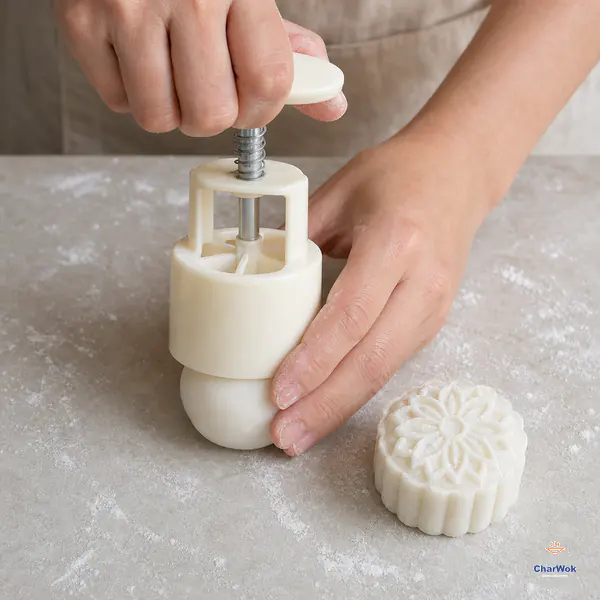
Use only a very thin dusting, set the mold opening-down and press firmly for one second; lift it straight up, then press again to release an intact sharply patterned mooncake.
Color, if you want it
For a tinted skin, knead ½ teaspoon of matcha powder, purple sweet potato powder, or freeze-dried berry powder into the cooked dough before portioning. Knead until the color is even, adding a few drops of milk if it gets dry. The same natural-powder logic that drives naturally colored dumplings works here; avoid liquid food coloring, which makes the dough wet and harder to handle.
When it goes wrong, and how to fix it
I keep a short list of the failures I have personally committed, because each has a clean fix.
- The dough splits while wrapping. It is too cold and stiff. Snow skin tears when it is chilled below about 15°C (59°F). Warm a piece in your hands for ten seconds before flattening, or knead in a few drops of milk to soften the whole batch.
- The wrapper is gummy and translucent after a day in the fridge. Normal, and the main drawback of the dish. The starch retrogrades, the same process that makes day-old rice hard. A 10-second burst in the microwave covered with cling film, or 2 minutes in a steamer, softens it back. Eat them the day you make them if you can.
- The filling weeps or feels grainy. The custard was either undercooked or scrambled. Undercooked, you can return it to low heat and stir until it firms. Scrambled, push it through a fine sieve and re-cook gently; next time, lower the heat and stir earlier.
- The mooncake sticks in the mold. Three causes: not enough toasted flour, dough too warm and sticky, or a wet center from undercooking. Dust the mold cavity, chill the dough 5 minutes, and confirm the cooked dough was fully set before shaping.
- The pattern is blurry. You did not press hard enough, or the filling-to-skin ratio was off and the wrapper was too thick. Press firmly and evenly, and aim for the 3:7 split.
Filling and flavor variations
The custard is one option among many. Once you trust the skin, swap the filling and you have a different dessert. A few I return to:
- Red bean paste. Smooth, not too sweet, the most traditional partner. Use this red bean paste and portion it the same way as the custard.
- Black sesame paste. Nutty and aromatic, especially good against a matcha-tinted skin. The black sesame filling here is ready to use.
- Lotus seed paste or mung bean paste. The classic bakery fillings; lighter and paler than red bean.
- Sticky rice and red bean. For a heartier, chewier center, borrow the idea from pumpkin mochi with red bean or tang yuan glutinous rice balls.
How to serve and store them
Snow skin mooncakes are a chilled dessert, served straight from the fridge or slightly tempered at room temperature for 5 minutes. Cut them with a sharp knife wiped clean between slices for a clean edge. They pair well with hot tea, jasmine or pu-erh, which cuts the sweetness the way tea does with eight treasure rice or fried sesame balls. For a cooler spread alongside, bubble tea or a glass of mango sago keeps the meal in the same register.
Store assembled mooncakes in an airtight container in the refrigerator and eat within 72 hours; the skin hardens past that. To freeze, lay them in a single layer until solid, then transfer to a bag for up to a month. Thaw in the fridge overnight and soften with a brief steam or microwave as above. I do not recommend freezing the cooked dough on its own, as the texture suffers more than the assembled mooncake.
A few notes on ingredients and equipment
Glutinous rice flour and wheat starch are the two items most likely to trip you up. Glutinous rice flour is labeled sweet rice flour or mochiko in American grocery stores; it is not the same as regular rice flour, and the two are not interchangeable despite similar names. Wheat starch is sometimes sold as wheat starch flour; if you cannot find it, cornstarch is the closest stand-in, though the skin loses a little of its translucence. The cooked-dough technique is shared with dishes like nian gao rice cake and lotus root with sticky rice, so once you have the flours on hand, you have opened several recipes at once. A spring-loaded mooncake mold is cheap online and worth buying; pressing these by hand gives a shapeless puck.
One honest limit: snow skin mooncakes do not keep the way baked ones do. The whole point is the fresh, tender skin, and that is a same-day or next-day pleasure. Plan to make them the morning of, or the day before, the event. For a shelf-stable gift that travels, the baked Cantonese mooncake is the better choice. For eating now, with friends, snow skin wins.
Frequently asked questions
A short round of the questions I get most often, answered straight.
Can I make the dough in advance? Yes. Cook the skin, knead it smooth, wrap tightly in cling film, and refrigerate up to 2 days. Bring it to room temperature and knead briefly before shaping, since cold dough cracks.
Do I have to use a mooncake mold? No, but the stamped pattern is the whole point visually. Without one, press the balls flat into rounds and call them mochi; the flavor is identical.
Why is my skin hard the next day? Starch retrogradation. Chill accelerates it. Reheat briefly covered, in a microwave for 10 to 15 seconds or a steamer for 2 minutes, and the softness returns.
Is wheat starch the same as wheat flour? No. Wheat starch has the gluten washed out; wheat flour does not. Using regular wheat flour will give a stretchy, bread-like skin that is wrong for this dish.
Can I reduce the sugar? Some. The powdered sugar in the skin does double duty as tenderizer, so cut no more than a third or the texture turns tough. The filling sugar is more flexible.