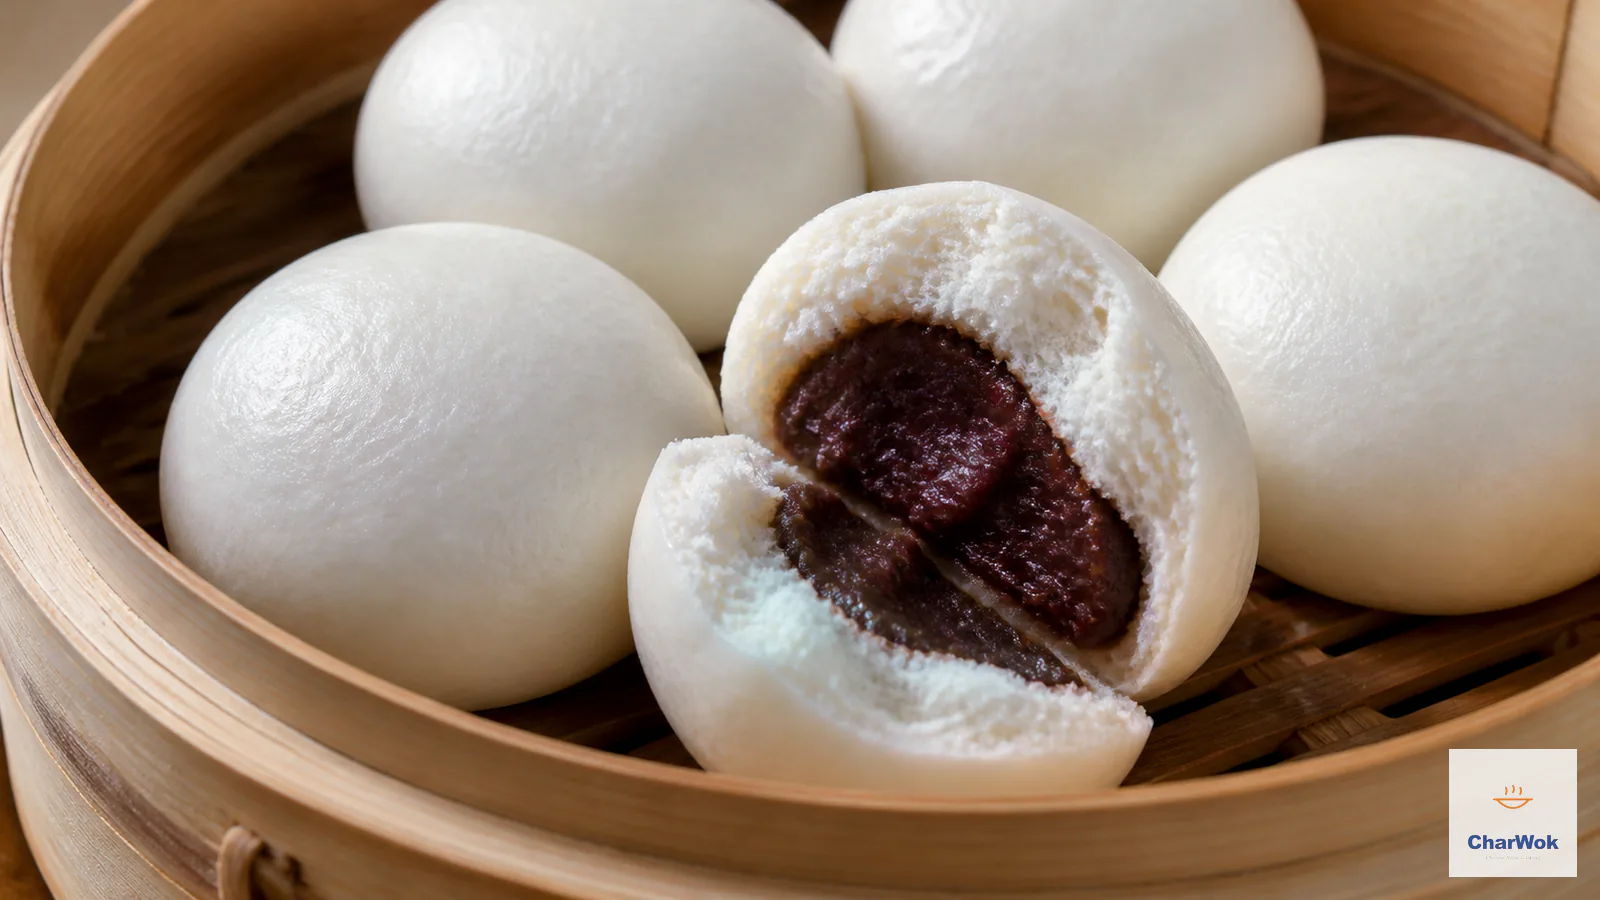
There is a quiet moment, somewhere between the second and third fold, when a red bean bun stops being dough and filling and becomes a small, sealed promise. You set it in the basket, seam down, and an hour later steam turns it pale and tall and impossibly soft. That contrast, a wrapper that tears like cotton candy against a dense, not-too-sweet bean paste, is the whole point of Dou Sha Bao (豆沙包). And the thing that ruins it at home is almost never the recipe. It is one of three habits I will walk you through below.
I have overworked this dough until it tore. I have undercooked the beans and gritted my teeth through sandy filling. I have lifted the steamer lid at the wrong second and watched a proud bun wrinkle like a punctured balloon. So this guide leads with the failures, because once you can name them, the dish is forgiving in a way few Chinese dough recipes are.
At a glance: Two leavening agents do the work: yeast for height and flavor, baking powder for an open, cottony crumb, so you skip the bulk rise and proof the shaped buns only, about 30 minutes. Steam 10 minutes over a full boil, then crack the lid gently. The dough-to-filling ratio I like is roughly 40 g wrapper to 30 g paste; lean any further toward filling and you will fight leaks.
What a red bean bun is, and where it sits at the table
Dou Sha Bao belongs to the large family of Chinese steamed breads that northern households treat less as a dessert and more as a steady, comforting staple: breakfast, a mid-afternoon snack, the carb on a plain congee supper. The cousin everyone recognizes is Mantou, the unfilled plain bun, and a filled red bean bun is essentially a Mantou that has been convinced to carry something sweet in its belly.
In Cantonese dim sum the same bun goes by the same name and shows up in the stacked bamboo cart right alongside Char Siu Bao and steamed custard buns (Nai Wong Bao). The Cantonese version tends toward a sweeter, darker, more polished paste and a snow-white, slightly tacky skin; the northern home version is rustler, often barely sweet, the paste left a little coarse. Both are correct. The recipe below splits the difference: smooth enough to please a dim-sum eater, restrained enough on sugar that you can eat two without flinching.
The filling comes first
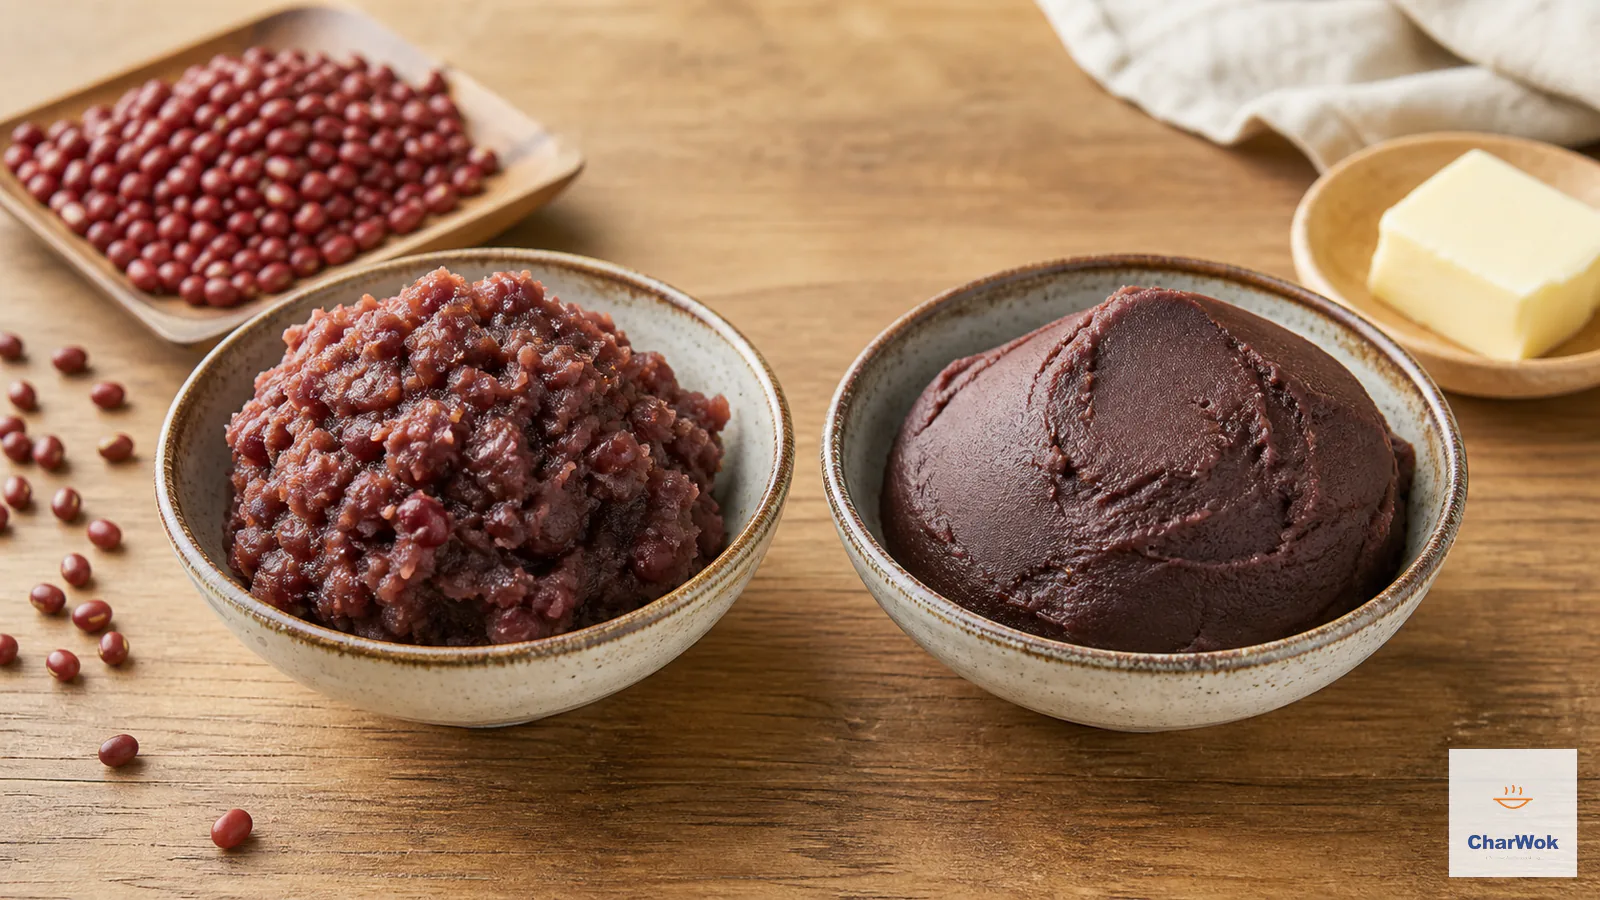
I will say it plainly: the paste is where these buns are won or lost, and the canned stuff in a plastic pouch is usually the reason a homemade bun tastes flat. Making your own takes one evening of mostly unattended simmering and pays off for months, because the paste freezes beautifully. If you have never done it, my two-method red bean paste guide walks through both a smooth blender version and a rustic hand-mashed one; the smooth version is what you want here.
Three things in that paste matter for a bun specifically. First, moisture: paste that is perfect for red bean soup is too wet for a bun and will soak through the wrapper during the proof. You want it dry enough to hold a soft ball between your fingers without sticking. Second, fat: a generous knob of butter (or coconut oil, halved, since coconut fat reads louder than dairy fat) is what turns cooked bean puree into something creamy. Leave it out and the filling eats like baby food. Third, sugar balance: I use mostly white sugar for clean sweetness and a spoon of dark brown for a faint caramel note. That brown sugar is the small detail that separates a memorable bun from a competent one.
One shortcut I endorse without guilt: canned cooked adzuki beans. They skip the 90-minute simmer entirely and are exactly what I reach for when turning leftover paste into red bean popsicles. Drain them well before blending, or you will be standing at the stove evaporating water for an extra ten minutes.
Why this dough uses two leavening agents
Most filled buns in my kitchen run on a single leavener. Traditional baozi dough, the kind I use for savory steamed buns (baozi) and pan-fried Sheng Jian Bao, is yeast-only and gets a long bulk rise. Flower rolls like my scallion hua juan lean on the same idea.
A sweet filled bun wants something different. The paste is heavy and dense; a yeast-only dough has to fight to lift it, and the proof drags. Adding baking powder alongside the yeast gives the dough a second, instant burst of gas the moment heat hits the steamer. It is the same trick that makes Cantonese barbecue pork buns split open so dramatically. For a closed, smooth-topped red bean bun the result is not a split top but a finer, more even crumb and a taller, lighter bun for the same effort.
The practical payoff is real: because the baking powder does the heavy lifting in the steamer, you skip the bulk rise entirely. Mix, knead, divide, fill, and the only rest the dough gets is the final proof of the shaped buns. That single change turns a half-day project into a two-hour one.
Ingredients
Ingredients at a glance
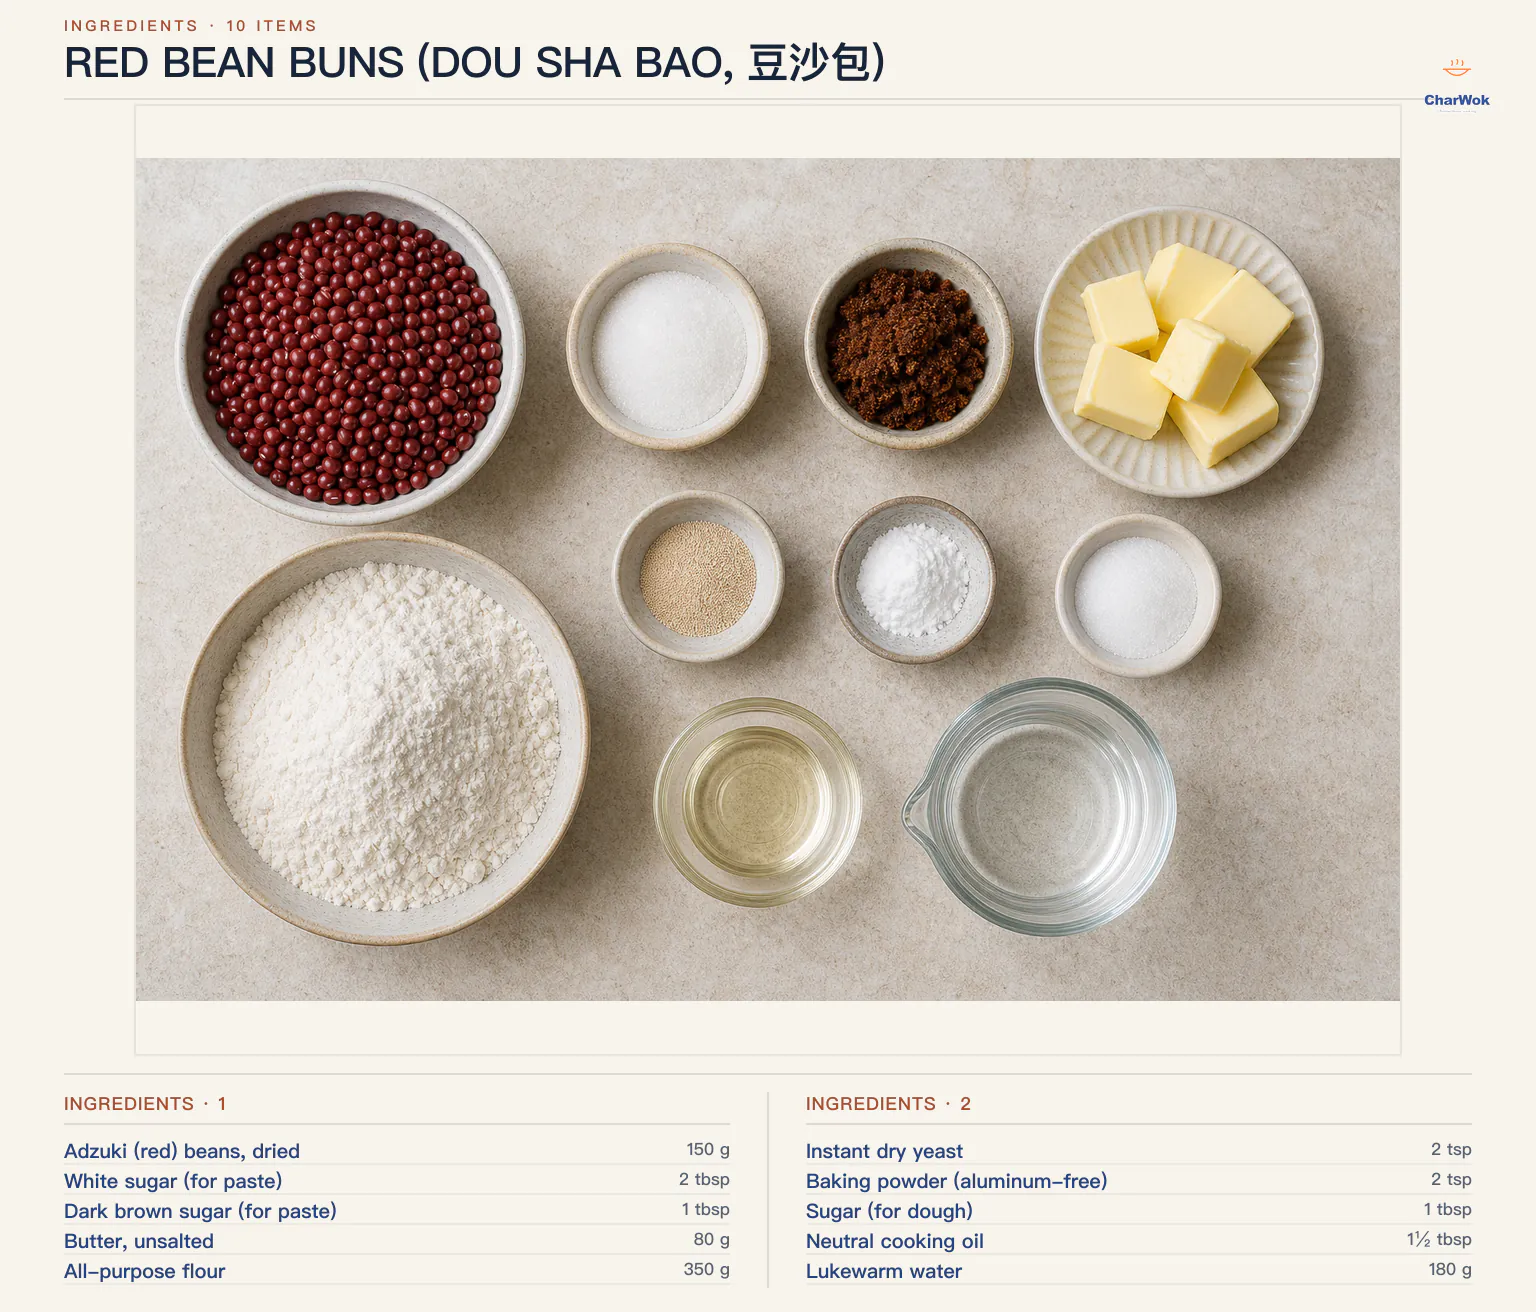
Makes 14 buns. Use a kitchen scale; the water ratio is tight enough that eyeballing it will cost you.
| Ingredient | Amount | Notes / substitute |
|---|---|---|
| Adzuki (red) beans, dried | 150 g | Or 350 g canned cooked adzuki, drained, to skip simmering |
| White sugar (for paste) | 2 tbsp | Adjust to taste; superfine dissolves cleanest |
| Dark brown sugar (for paste) | 1 tbsp | Adds caramel depth; omit only if you must |
| Butter, unsalted | 80 g | Or coconut oil, use 40 g (coconut flavor is louder) |
| All-purpose flour | 350 g | Cake flour or Chinese bao flour gives an even softer crumb |
| Instant dry yeast | 2 tsp | Active-dry works; bloom it in the lukewarm water first |
| Baking powder (aluminum-free) | 2 tsp | Do not swap baking soda; wrong chemistry entirely |
| Sugar (for dough) | 1 tbsp | Feeds the yeast and tenderizes the crumb |
| Neutral cooking oil | 1½ tbsp | Canola, grapeseed, or refined peanut; keeps the dough soft |
| Lukewarm water | 180 g | About body temperature; adjust ±10 g by flour brand |
The method, step by step
- Cook the beans (or open a can). Soak dried adzuki overnight, then simmer in 500 ml water for about 90 minutes, until a bean mash is effortless between your fingers. If you have a pressure cooker, 25 minutes at high pressure does the same work. Canned beans skip straight to the next step; just drain them very well. Wet beans mean a longer stovetop reduction later.
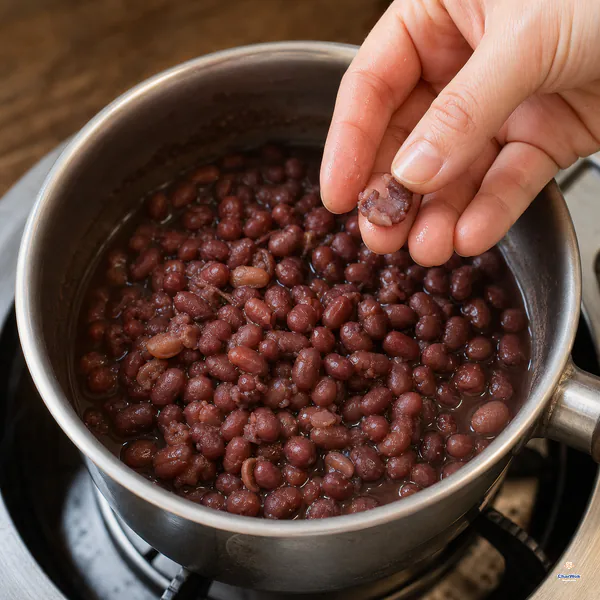
After the overnight soak, simmer the beans in 500 millilitres of water for about 90 minutes, until one bean crushes effortlessly between your fingers; drain very well.
- Blend the paste while the beans are warm. Warm beans blend far smoother than cold ones, so do not let them sit. Load the drained beans into a blender or food processor with both sugars and the butter, and run it on high. Add water only by the tablespoon, and only as much as the blades demand to keep moving; the wetter the puree now, the longer you will cook it down.
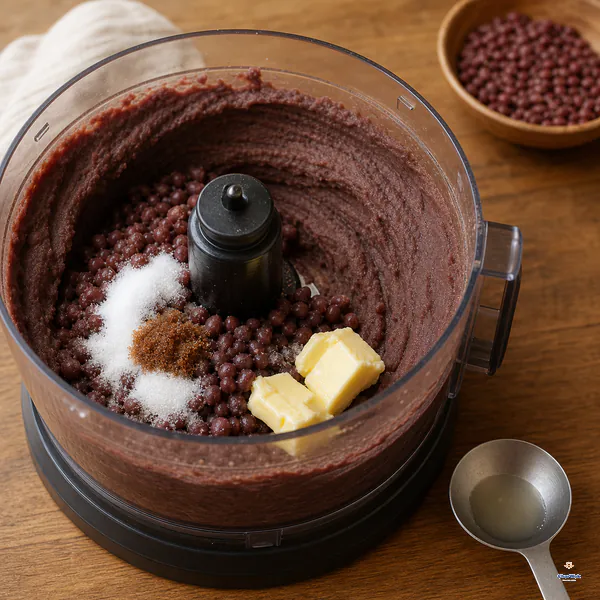
Blend the warm drained beans with both sugars and butter; add bean water only by the tablespoon when the blades truly need it, because extra water lengthens reduction.
- Cook the puree down to a soft ball. Tip the puree into a non-stick pan over medium-high heat and stir constantly, scraping the bottom and folding the mass over itself. You are driving off water so the paste will hold its shape inside a bun. The cue is visual and tactile: the color deepens, the paste moves as one sluggish mass, and when you drag a spatula through it the channel fills back in slowly rather than immediately. Pull it then; it firms up further as it cools, and overcooked paste turns crumbly and hard to wrap.
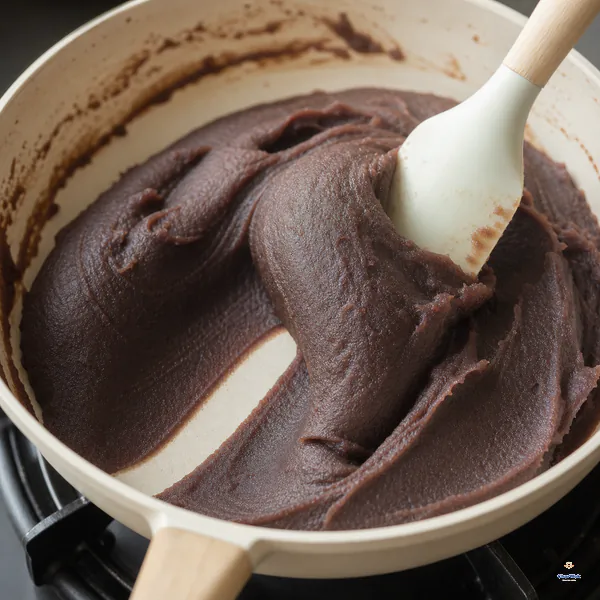
Stir and fold constantly over medium-high heat until the paste deepens in colour, holds together and only slowly fills the channel left by the spatula.
- Cool the paste completely. Spread it on a plate to speed this up. Warm paste will melt the fat in the dough and grease your wrappers, which is the fast track to blowouts at the seam.
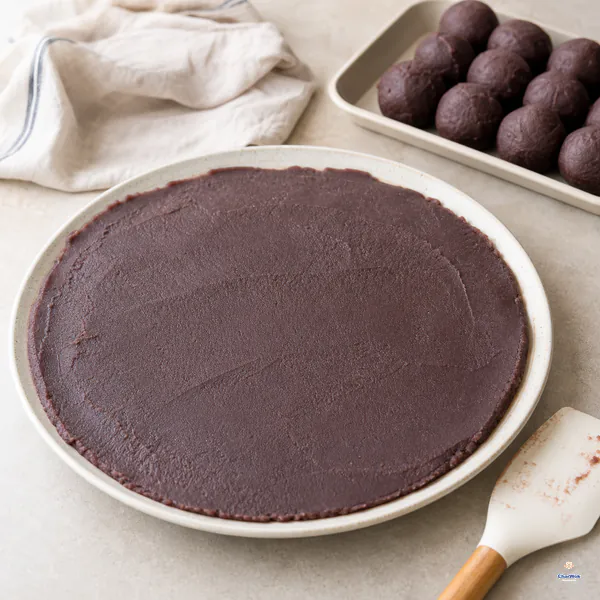
Spread the paste thinly on a plate and let it cool completely before wrapping; warm paste can grease the dough and weaken the seam.
- Mix the dough, then let it rest before you finish kneading. Combine the flour, sugar, baking powder, yeast, and oil in a bowl. Add the water gradually, stirring with chopsticks or a spatula until shaggy, then bring it together by hand into a rough ball. Cover and rest 10 minutes. This short autolyse lets the flour hydrate and the gluten relax, so the 1–2 minutes of kneading that follows produces a smooth, silky dough where ten minutes of brute force would only have made it tough. A stand mixer does the whole job in about 8 minutes on low.
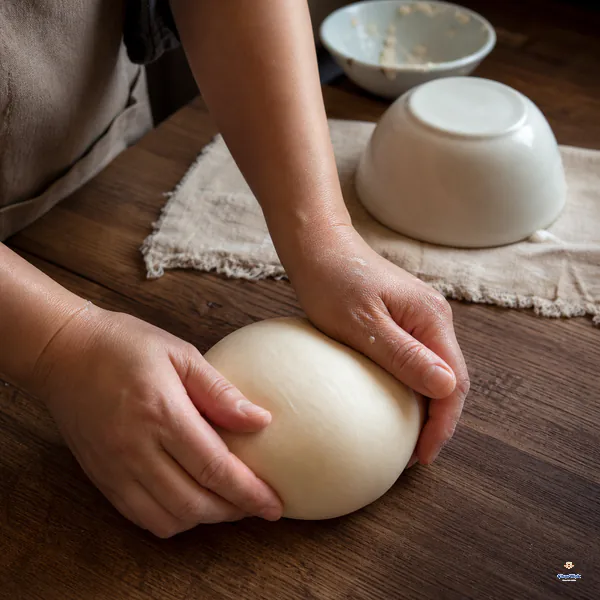
Mix to a rough dough, cover and rest for 10 minutes, then knead for another 1 to 2 minutes until smooth; this dough goes straight to dividing without an initial proof.
- Divide and roll, one at a time. Roll the dough into a rope and cut it into 14 pieces, roughly 40 g each. Keep the unused pieces under a damp cloth or overturned bowl. A dry skin on the dough is what causes the surface of a finished bun to look cracked. Flatten a piece into a disc about 10 cm across, then roll only the outer two-thirds, rotating as you go, so the edge thins while the center stays thicker. That thick center is the bun's floor; without it the filling splits through the bottom in the steamer.
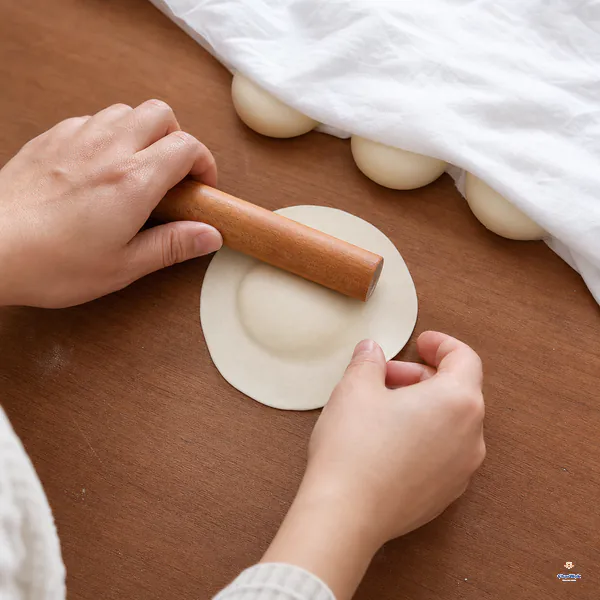
Divide the rope into 14 pieces, keep unused dough covered, and roll each wrapper to about 10 centimetres with a thin edge and a thicker supporting centre.
- Fill and seal, seam down. Put about 30 g of cooled paste in the center. Pleat the edge shut any way that closes it completely; the classic bao spiral or a simple four-corner pinch both work, because the seam ends up hidden underneath. Set the bun seal-side down on the counter and roll it gently between cupped palms to nudge it into a tall, round shape. A flat bun now is a flat bun after steaming.
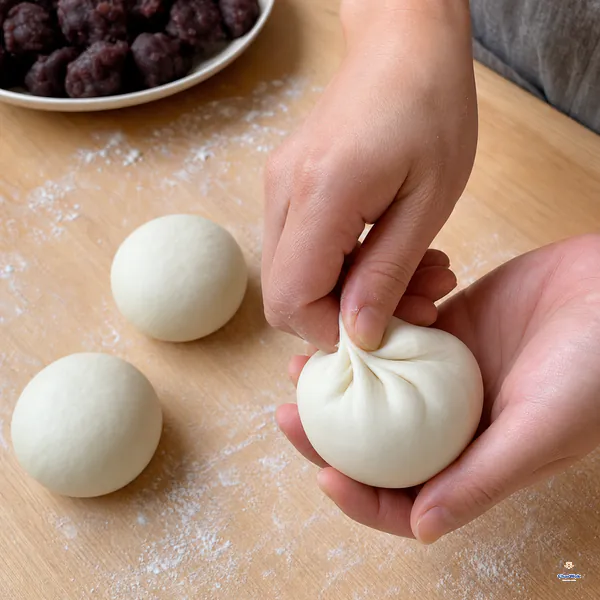
Enclose about 30 grams of completely cooled paste, pinch every gap shut, then turn the seam down and cup the bun into a slightly tall round shape.
- Proof the shaped buns, uncovered, for 30 minutes. Set them in a steamer basket lined with parchment (or lightly oiled, if your steamer is bare metal) with generous space between them; they will spread and swell. Leave the lid off. You are looking for a visible but modest change: puffy, lighter, springy to a fingertip. They should not double before they hit the heat.
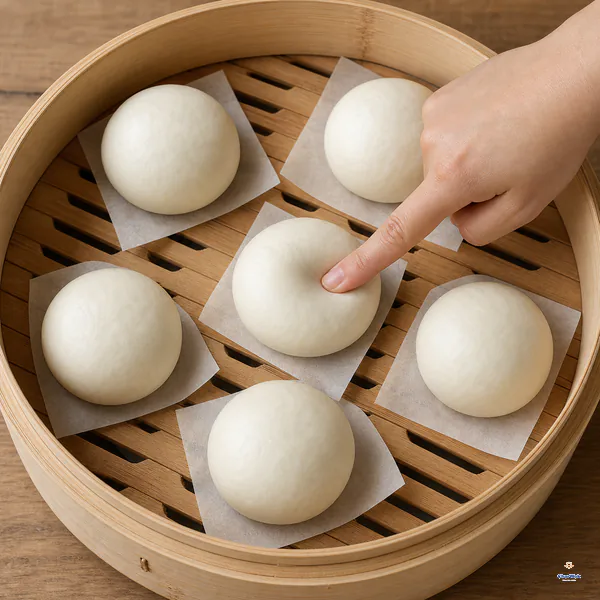
Proof uncovered in the lined steamer for about 30 minutes, until the buns look modestly larger, puffy and light; they should not double before steaming.
- Steam over a full boil for 10 minutes, then vent carefully. Get the water rolling before the baskets go in; you can stack two or three. Steam 10 minutes over medium-high heat, then turn off the burner and crack the lid a finger's width for a count of five before lifting it fully. A sudden, full lift dumps the temperature and the buns collapse. This is the single most common failure, and it is purely mechanical.
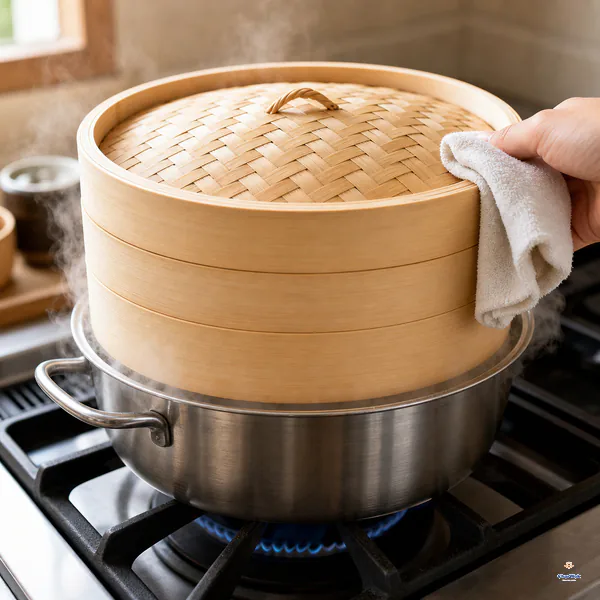
Set the covered baskets over fully boiling water and steam for 10 minutes over medium-high heat; after switching off, crack the lid briefly before lifting it fully.
When good buns go wrong
This is the section I wish someone had handed me the first time. Most red bean bun disasters sort into four bins.
The bun collapses or wrinkles the instant you lift the lid
Almost always a thermal shock, not a recipe fault. The steam inside the crumb is holding the structure up; rip the lid off and that steam flash-condenses and the walls cave. Crack the lid a crack for five seconds first. If that does not fix it, your dough was overproofed. Buns that have already doubled before steaming have no gas left to give in the heat, so they sag. Proof for visible plumpness, not for size.
The skin is yellowish, dense, or smells of alcohol
That is dead or tired yeast, and it usually announces itself during the proof: the buns barely move in 30 minutes. Proof your yeast in a little of the lukewarm water with a pinch of sugar for five minutes before mixing; if it does not foam, throw it out and start over. A yellow tint on its own can also mean aluminum-containing baking powder; buy the aluminum-free kind.
The filling blows out the seam or the bottom
Two causes. The paste was too wet or too warm; cook it down further next time, and cool it fully. Or the wrapper was rolled evenly thin all over, leaving no thick pad in the center to carry the weight. Roll the edges thin and the center thick, and never skimp on the final pleat.
The surface is cracked or mottled
A dry skin formed on the dough while you worked. Cover the unused pieces, and if your kitchen is very dry, drape a barely damp towel rather than a dry cloth. Also check that your steam is a gentle, even roll and not a violent eruption. Water droplets bouncing onto the buns pit the surface.
Variations, and what to do with the leftover paste
This dough is a workhorse. Once you trust it, fill it with anything. The same wrapper carries braised pork belly for gua bao just as happily as it carries beans. For a sweeter table, the paste you will inevitably have left over is the filling I use for pumpkin mochi with red bean and for the glutinous leaf-wrapped sticky rice cakes (Ye'er Ba) when I make a sweet version.
For the buns themselves, a few directions I keep coming back to. Add a half-teaspoon of matcha powder to the dough for a pale-green skin and a bittersweet counterpoint to the beans. Fold a teaspoon of toasted sesame seeds into the paste for texture. Or shape the dough flat and pan-fry it after steaming for a crisp bottom, in the spirit of Sheng Jian Bao. The contrast of a crackling base against the soft bean filling is worth the extra pan.
If you want these for a celebration, a single dot of red food coloring on top with a chopstick tip is the traditional mark. In older households it was how you told a red bean bun from a plain Mantou in a crowded steamer stack at New Year. It does nothing for flavor and everything for the table.
Storage and reheating
The paste keeps 3 days in the fridge or 2 months in the freezer; bring it fully to room temperature before wrapping, or it will be too firm to portion. Do not freeze the uncooked shaped buns; the leavening will spend itself in the cold and you will get hockey pucks. Cooked buns, however, freeze beautifully: 3 days in the fridge, 2 months in the freezer, sealed airtight. Reheat from chilled with a 3-minute steam, or straight from frozen with a 6-minute steam. The microwave will work in a pinch under a damp paper towel, but it toughens the skin and I would not serve it to company.
FAQ
A few questions that come up every time I teach this recipe.
Can I make the dough without baking powder?
Yes, but expect a denser, chewier bun and add a 60-to-90-minute bulk rise after kneading, then proof the shaped buns until nearly doubled. The baking powder is what lets you skip that rise and still get a light crumb under a heavy filling.
Why are my buns collapsing after steaming?
Either the lid came off too fast or the buns overproofed before steaming. Vent the lid for five seconds before opening fully, and proof only until puffy and springy, not until doubled.
Can I use store-bought red bean paste?
You can, and many brands are fine, but they tend to be sweeter and wetter than homemade. If yours is loose, cook it down in a pan for a few minutes until it holds a soft ball, or your buns will weep at the seam.
Is active dry yeast okay instead of instant?
It is. Dissolve it first in the lukewarm water with the tablespoon of dough sugar for five minutes until it foams, then proceed. The larger granules need that head start to hydrate evenly.
One last note, because it is the line between a good bun and a great one. The dough is forgiving; the steam is not. Get the water to a full boil before the baskets go in, keep the heat at a steady medium-high, and lift the lid slowly. Do those three things and the rest of the recipe will forgive a great deal.